Triangulation


|
Triangulation |
|
|
The triangulation is based on the measurement function, whereas here the marking off with a pair of compasses is supported. To access this function select the entry "Surgeries->Triangulation" from the Treeview or from the main menu. A dialog is displayed that assists you with the triangulation. This dialog offers the possibility to store new points in a list of points for each eye, which were marked off with the aid of the triangulation function. These points are saved with the patient data and can always be displayed via the "Points of Reference" function. Consequently, if you want to show the previously marked off (and stored) points again, you have to enable the visualization of the points of reference for the specific eye. |
A point can be marked off in two different ways:
| 1. | Textual input of the distances |
| 2. | Interactive marking off with the mouse |
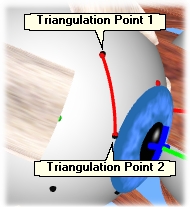
In both variants, you first have to define the measured section or the two points, from where you want to mark off. This section is defined in the same way as in the "Measure" function. If you have measured a distance with the "Measure" function before and the measured section is still displayed, you can proceed with the triangulation by determining the two distances you want to mark off.
|
Otherwise, you have to move the cursor over one of the two globes. Then you perform a left-click onto the globe and while keeping the left mouse button pressed you draw in a section. If the mouse button is released at the end of the measured section, two points are drawn in. They represent the initial points for the triangulation. After the measured section was drawn in, you can continue immediately with the triangulation. |
|
As long as "Triangulation" is selected as the active surgery type you cannot transpose muscle insertions (neither interactive nor non-graphical)! |
Textual Input of the Distances
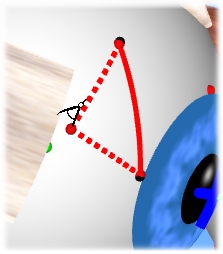
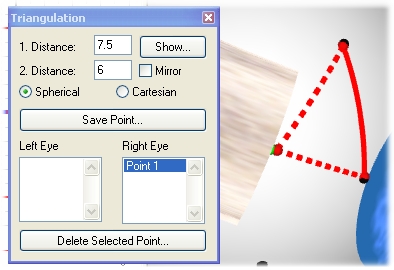
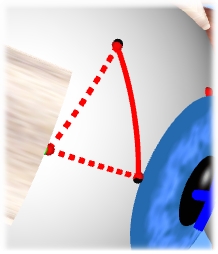
If you want to input the distances textually, you have to fill in the fields "1. Distance" and "2. Distance" in the triangulation dialog and afterwards click on "Show...". Now the distances are marked off and the new point is drawn in connected with dashed lines. You can repeat this procedure as long as you want. With "Spherical" and "Cartesian" you can determine the type of the distance calculation for your entered values. Due to the fact that you can mark off two possible points at a time, you can use the option "Mirror" to draw in the respective opposite point.
Another possibility is to input only one distance and define the other one interactively with the mouse. Therefore, enter either the distance to the first or to the second point, set the respective other distance to 0 and afterwards click on "Show...". Now you can move the resulting point along the circle where the entered distance is always fulfilled. This way you can interactively define the second distance. To move the drawn in point simply left-click on it and change its position by moving the mouse with the left mouse button pressed.
![]()
|
If you have entered both distances textually, you cannot move the marked off point with the mouse! |
Interactive Marking off with the Mouse
|
To interactively mark off with the mouse, you have to left-click on the target point, which you want to mark off, after defining a section. You can keep the left mouse button pressed and pull the mouse anywhere you want. You can also left-click on the marked off point later and change its position while moving the mouse with the left mouse button pressed. |
Status Bar
![]()
In both variants the two marked off distances are displayed in the status bar as soon as the cursor is located over the globe that was used for the marking off.
Saving of Points
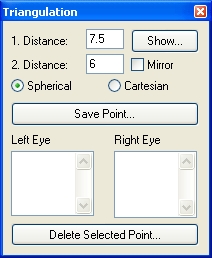
After a point was marked off, you can save it together with the patient data. Therefore, simply click on "Save Point...". The point is inserted into the list of the corresponding eye.
|
By clicking on a saved point in one of the lists, the point is displayed on the globe again. Once a marked off point is saved, it is taken into account as an additional reference point and shown together with the other reference points if the option "Points of Reference" is activated. |
If you want to delete a saved point, click on the point in the list and afterwards on "Delete Selected Point...".
|
If you keep the left mouse button pressed during the triangulation and draw in a section or a point to mark off, you can cancel the procedure anytime by hitting the "ESC" key. |