General Functions


|
General Functions |
|
The "General Functions" toolbar provides the most important navigation and viewing functions.
|
Use this button to undo changes made to the medical data (globe data, muscle data, distribution of innervations, motor fusional ability). You can undo up to 20 changes. You can also access this function via the main menu under "Data->Undo".
|
|
Use this button to restore previously undone changes made to the medical data. Up to 20 changes can be restored. You can also access this function via the main menu under "Data->Redo".
|
After clicking on one of the two buttons, a dialog with the appropriate changes is displayed. If you confirm the dialog with "OK", the changes are applied. You can turn off this dialog via the general options. If you do so, the changes are applied immediately without asking.
Use the following buttons to modify the visualization of the 3D-view:
|
Use these two buttons to rotate the 3D-view around the horizontal x-axis (above or beneath).
|
|
Use these two buttons to rotate the 3D-view around the forward pointing y-axis (skew to the right or to the left).
|
|
Use these two buttons to rotate the 3D-view around the vertical z-axis (left or right).
|
|
Use these two buttons to zoom in or to zoom out the 3D-view (zoom function).
|
|
This button resets the 3D-view to its initial position (camera reset). This affects only the current rotation, translation and zoom of the view. Resetting the view does not cause a change of the simulation parameters. You can also access this function via the main menu under "Options->Reset Camera-Rotation".
|
|
This button resets both eyes to the primary position (eye position reset). You can also access this function via the main menu under "Options->Reset Gaze-Rotations".
|
Further possibilities to modify the visualization of the 3D-view can be found in the chapter "3D-View".
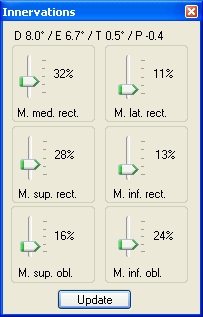
The innervations dialog provides the possibility to manually adjust the specific activation potentials of the muscles in percentage. You can access this dialog via the main menu under "Views-> Innervations" or via the "General Functions" toolbar by clicking on the innervations symbol ![]() .
.
|
The innervations dialog assigns a slider in the range from 0% to 100% to each muscle. The maximum deflection of a slider means that the muscle is maximally innervated. Depending on the current simulation, the eye position of the fixing eye in the 3D-view is calculated. If the following eye is activated, its position is also calculated.
|
The sliders are adapted in consideration of the innervations of the agonistic and the antagonistic muscles. This obviously results into a different position of the sliders compared to the manual positioning, which is carried out without considering the law of the reciprocal innervations. Therefore, there exists no unambiguous mapping between an innervation pattern of all six muscles and an eye position.
Furthermore, the upper corner of this dialog displays the gaze position defined via the current innervation pattern. "D" stands for adduction/abduction, "E" for elevation/depression, "T" for intorsion/extorsion and "P" for protrusion/retraction. "D", "E" and "T" are declared in degrees and "P" is declared in mm. The algebraic signs are defined as described in the chapter "geometric models".
The button "Following Eye" switches the calculation of the eye position of the following eye in the 3D-view on or off. That means, that when the currently fixing eye (blue cross) is moved into a new position, the position of the currently following eye (red cross) is also calculated with respect to the current simulation parameters. You can switch the following eye on or off by clicking on the symbol in the "General Functions" toolbar or via the main menu under the menu item "Options->Following Eye".
Interpolation for Real-Time Assessment ![]()
With this button you can switch the interpolation mode for the real-time assessment on or off. Further information concerning this function can be found in the chapter "Interpolation for Real-Time Assessment". You can also access this function via the main menu under "Options->Interpolation for Real-Time Assessment".
Cover Test ![]()
With this button you can switch the simulation of the cover test on or off. Further information concerning this function can be found in the chapter "Cover Test".
3D Body ![]()
The "3D Body" button allows to show or hide the body displayed in the 3D-view. You can also access this function via the main menu under "Options->3D Body".
This symbol allows to open the dialog for the configuration of the 3D body transparency of the body displayed in the 3D-view.
|
With this dialog you can interactively change the transparency of the body displayed in the 3D-view. 100% transparency is equivalent to switching off the displayed 3D body. You can also access this dialog via the main menu under "Views->3D Body Transparency". |
Blinking ![]()
With this button you can switch the blinking on or off. This function is only available, if the 3D body is displayed and the OpenGL™ graphic acceleration is activated (see general options). This function has no influence on the simulation result. You can also switch the blinking on or off via the main menu under "Options->Blinking".
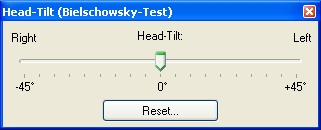
This button opens the dialog to set the head-tilt.
|
If you change the head-tilt, the current tilt is visualized in the 3D-view and is also used for the simulation of the Hess-Lancester test. By changing the head-tilt the so-called Bielschowsky-Test can be simulated. |
During this test the patient tilts his head in the direction of the left or the right shoulder to stimulate the vestibulo ocular reflex (VOR). Thereby, the intorsion of the eye on the side to which the head was tilted is amplified and accordingly the extorsion of the other eye is amplified as well.
The button "Reset..." within the dialog resets the head-tilt back to 0°. You can also access this dialog via the main menu under "Views->Head-Tilt (Bielschowsky-Test)".
|
The selected head-tilt remains set until it is changed again in this dialog! The functions "Reset View", "Reset Window Layout", "Reset Camera-Rotation", "Reset Gaze-Rotations" and the loading of any view does not reset the head-tilt! Solely the function "Reset All Settings" in the general options also resets the head-tilt back to 0°. |
Adjust Size of Hess-Diagrams ![]()
![]()
With this button you can adapt the size of the diagram-window, where the Hess-diagram for the right eye (left eye fixing) is displayed, to the size of the diagram-window, where the Hess-diagram for the left eye (right eye fixing) is displayed and vice versa. These buttons are only active, if both Hess-diagrams are currently displayed and both diagram-windows, where the Hess-diagrams are displayed, are docked to the main window.
Autosize Hess-Diagrams ![]()
By default the boundaries of the coordinate axes in each of the two Hess-diagrams are chosen in a way that all visible points within the diagram can be ideally displayed (in the default gaze pattern e.g. from -40° to +40° horizontal and vertical). Due to the possibly different number or different locations of points in both fixations, it can happen, that both diagrams use different boundaries for the coordinate axes. With this function you can enforce, that both Hess-diagrams for left eye fixing and right eye fixing use the same boundaries for the coordinate axes. You can also access this function via the main menu under "Options->Autosize Hess-Diagrams".
SMI 3D VOG Mode ![]()
With this button you can activate a mode to use SEE++ for real-time visualization of the currently measured data of a 3D VOG (Video Oculography) system of the company SMI. Without such a system the activation of this mode is not meaningful. You can also access this function via the main menu under "Options->Visualize SMI 3D VOG Data".
|
Do not forget to deactivate the 3D VOG Mode again, if you do not need it any more, because as long as it is activated you cannot change the eye positions in the 3D-view (the eye positions are determined through the measured data of the 3D VOG system). Furthermore, the innervations of the muscles cannot be relocated interactively any more to avoid viewing problems. |