Create Movie


|
Create Movie |
|
Another option to export data from SEE++ is the function to save the current simulation results as an AVI movie for better illustration. Thereby the "virtual patient" (in the 3D-view) sequentially looks at different gaze positions. These movies can be played in numerous players (Windows® Mediaplayer, etc.) and in presentations (e.g.: PowerPoint®).
In order to create a movie it is necessary that at least one simulation result (right eye fixing and/or left eye fixing) is displayed in one of the diagram-windows of SEE++. Otherwise the function in the main menu under "Patient->3D-Modell->Create Movie" is deactivated. That is because the fixation points of the gaze pattern for right eye fixing or left eye fixing are used as a template for the creation of the movie. If both fixations are displayed in the diagram-windows of SEE++ before the dialog is opened, you can choose between right eye fixing and left eye fixing via the "Used Hess-Diagram" box.
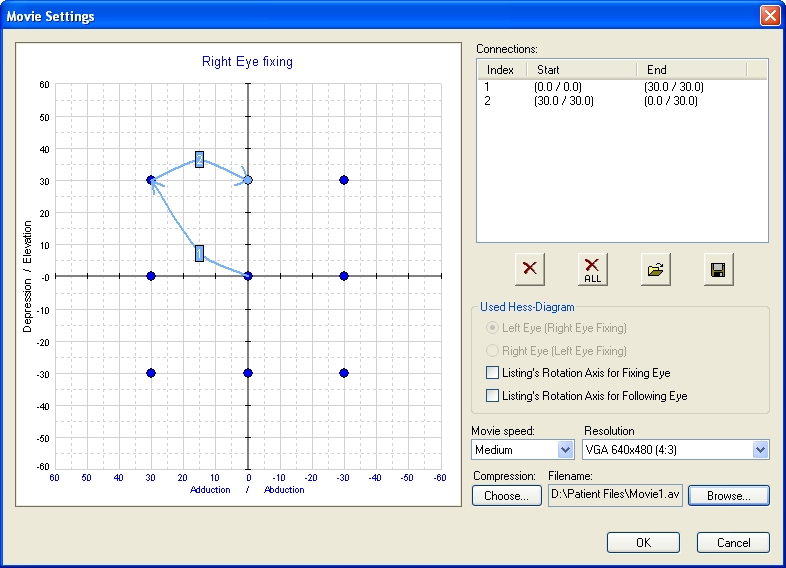
Before you can create a movie, you first have to define which fixation positions in which sequence the "virtual patient" should look at ("animation path"). For this purpose select any fixation position of the used Hess-diagram (blue point) by left-clicking on the appropriate point. Then move the mouse while keeping the left mouse button pressed over any other fixation position and release the mouse button as soon as the target point is colored light blue. Now an arrow with the number "1" is drawn in between the two fixation positions. You can now always draw a new arrow from the last selected point to another fixation position over and over again. The arrows are thereby numbered ascending and the drawn in connections are additionally displayed in the list on the right hand side of the dialog. If you left-click on one of the connections in the list, the appropriate arrow is marked red. The arrows define the sequence and the selection of the fixation positions, which the "virtual patient" looks at in chronological order for the creation of a movie. Thereby for each fixation position the position of the following eye is calculated. That way the characteristics of a possible pathological situation can be dynamically illustrated in a clear way.
To make it easier to create an animation path, the following functions are provided:
|
With a click on this button the last drawn in arrow (the arrow with the highest number) is deleted. This button has no functionality, if no arrows exist.
|
|
This button deletes all existing arrows.
|
|
With this function you can load an animation path from a file. When loading an animation path file, the current animation path is replaced by the one from the file.
|

After clicking on the button for the loading of an animation path, the dialog for the selection of an animation path file is opened. These files have the extension ".sap". Navigate to the particular directory and click on the .sap file you want to load. Afterwards click on "Open" or "Öffnen" to load the file. If you push the "Cancel" or "Abbrechen" button, no file is loaded and the current animation path is retained unchanged.
|
If you have drawn in an animation path, you can use this function to save it to a file. Files that save animation paths have the extension ".sap" and can be loaded again anytime via the open function (see above).
|
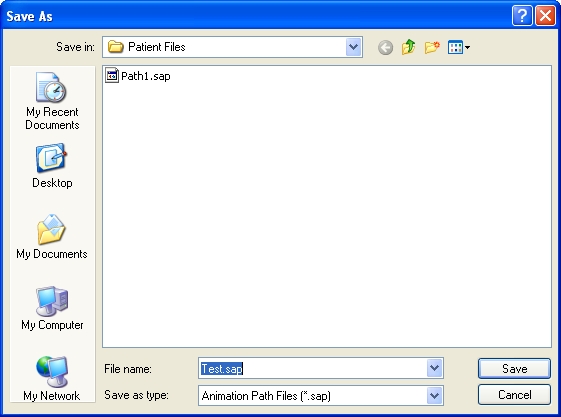
After clicking on the button for the saving of an animation path, the dialog for the selection of the target directory and the filename is opened. Proceed like opening an animation path file by navigating to the particular directory and clicking the "Save" or "Speichern" button after naming the file.
|
A saved animation path is independent from the selected gaze pattern (right eye fixing and left eye fixing). |
In the "Used Hess-Diagram" box you can also choose, if Listing's rotation axis should be displayed for the fixing and/or the following eye in the movie. Additionally, you can choose a movie speed (slow, medium, fast), which specifies how fast the eye movement is done in the movie. The resolution determines the size of the movie and therefore the quality of the single frames of the movie (high resolution = better quality, but larger file). The list of the available resolutions contains the "name" of the resolution (e.g. "VGA"), the horizontal and vertical size of the resolution in pixel (e.g. 640x480) as well as the aspect ratio (width-to-height ratio, e.g. 4:3). Via the "Current Size" resolution you can achieve that the current size of the 3D-view is used for the resolution of the movie.
Furthermore, you can configure the compression of the movie (via the button "Choose..." under "Compression") by selecting a specific codec. The selection of a codec determines the format, in which the movie is encoded and/or compressed. This codec has to be installed on the computer where you want to play the movie. By default some codecs are installed in Windows® for the creation of movies, but they provide only limited quality. Therefore, the "XviD"-Codec (www.xvid.org) is installed together with SEE++. This codec is free for use and provides a good movie quality with high compression. Furthermore, due to the automatic installation of the codec together with SEE++, it is guaranteed that the movies created with SEE++ can be played on any computer where SEE++ is installed (unless a different codec was manually selected for the creation of a movie).
|
Only change the default codec (XviD), if you are absolutely sure. Your movies could have bad quality or possibly cannot be played on a different computer. |
You have to specify a file name and a directory before you can create the movie. Via the "Browse..." button the default dialog for saving AVI files is opened. Navigate to the directory where you want to save the movie file and name the movie file appropriately. The file extension of a movie is always ".avi". The selected directory as well as the chosen name are displayed in the field below "Filename" after the default dialog for saving AVI files has been closed with a click on "OK".
If you have finished all your settings, confirm the dialog with "OK" and the movie will be created. With a click on "Cancel" the dialog is closed and no movie is created. The current animation path remains set until SEE++ is quit, independently of the button you used to close the dialog ("OK" or "Cancel").
|
If you want to influence the creation of a movie regarding the available fixation points, you have to change the gaze pattern of the corresponding fixation. If you want to cancel the creation of a movie, push the "ESC" key during the creation process. The canceling can take several seconds! After canceling the creation, those parts of the movie, which were already created until the process was canceled, are stored in the AVI file. |