Gaze Pattern


|
Gaze Pattern |
|
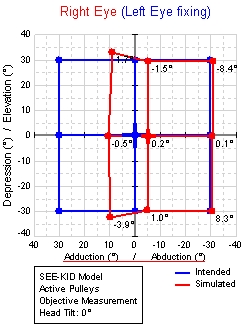
A gaze pattern forms the basis for the simulation of the Hess-Lancester-Test. When executing the simulation for each point drawn into the gaze pattern, a fixation of the particular fixing eye is accomplished. According to the description of the simulation, the other eye is considered as the following eye and diverges, depending on the pathological situation, from the fixing eye. Within the Hess-Lancester-Diagram the blue points represent the fixation positions denoted by the gaze pattern and the red points describe the resulting deviation points of the following eye.
|
A left eye fixing is denoted here as an example. This means that the left eye consecutively fixates gaze positions shown in blue and then the SEE++ system calculates the position of the in this case right following eye with a given pathology (in this case a paresis of the right medial rectus muscle). The squint angle can be determined through the comparison of the neighboring blue and red points. The given blue gaze pattern can be modified in the gaze pattern dialog. There exists a complete gaze pattern for the right eye fixing and the left eye fixing, because the Hess-Test is executed for both eyes (first left eye fixing, then right eye fixing or the other way round). The modification of a gaze pattern is necessary when the fixing eye reacts pathological and therefore cannot reach certain fixation points (blue) any more. Then you can either delete these points or change the gaze pattern in such a way that a fixation is possible again. |
You can access the dialog to change a gaze pattern via the main menu under "Data->Gaze Pattern" or via the Treeview under "Medical Data->Gaze Pattern".
This dialog allows the modification of the gaze pattern of the current scenario. If you want to edit the gaze pattern of another scenario, you first have to set the desired scenario active (see scenarios).
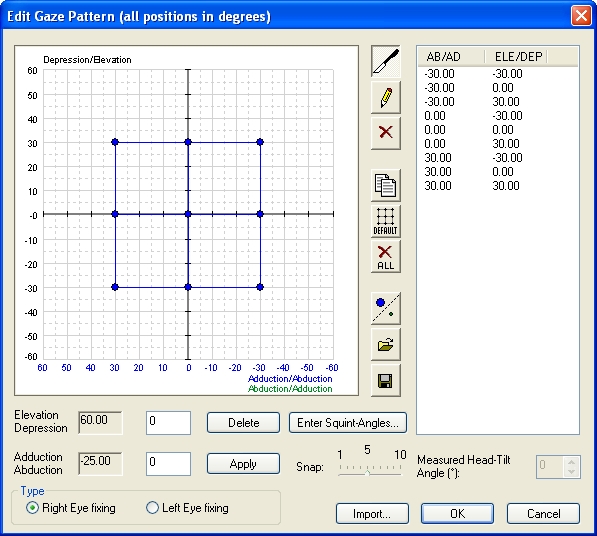
The gaze pattern dialog shows the current gaze pattern, displayed in blue, for one fixation direction. You can switch between the gaze pattern for left eye fixing and right eye fixing via the "Type" box.

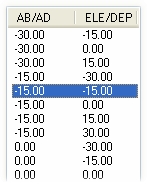
The point list shows all entered fixation points in textual form:
|
You can select a point with a single click on a particular entry. Then the coordinates of the chosen fixation point are shown in the text fields for changing and deletion. Furthermore, the point is marked red in the gaze pattern. |
|
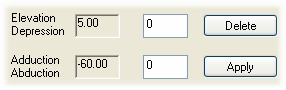
Single fixation points can be edited by textually entering the data into the free fields for elevation/depression and adduction/abduction. |
Confirm an entered point with "Apply" or delete the actually marked point in the list with "Delete".
If you want to use the mouse to edit the points, you have to use the provided buttons:
|
Push this button, if you want to move the points within the gaze pattern with the mouse. To move a point, navigate the mouse over the desired point, press down the left mouse button and then, while still pressing the mouse button, pull the point to the desired position.
|
|
Push this button to insert new points into the gaze pattern. Then move the mouse to the desired position in the diagram and insert a new point by clicking the left mouse button once.
|
|
Moreover, this function offers the possibility to connect two points with each other. You can achieve this by left-clicking on an existing point and then, while still pressing the mouse button, pulling a line to another point. The line is drawn, when you release the left mouse button over the target point.
|
|
The snap defines the step size that the points can be moved or set within the gaze pattern with the mouse. A snap of 5 is equivalent to a step size of 5°. Reduce the snap to place points more precisely with the mouse.
|
|
Push this button to delete single points within the gaze pattern. Move the mouse over the point to delete in the diagram and delete it by clicking the left mouse button once.
|
|
This button allows you to copy (blue or green) points of one fixation into another fixation. SEE++ displays a warning, if existing points are going to be overwritten.
|
|
Pushing this button deletes all points of the current gaze pattern and replaces them with the default gaze pattern (9 points in the main gaze directions with an maximum gaze angle of 30° each).
|
|
This button deletes all fixation points within the current gaze pattern.
|
|
With this function you can load a gaze pattern from a file. When loading a gaze pattern file, the current gaze pattern is replaced by the one from the file.
|
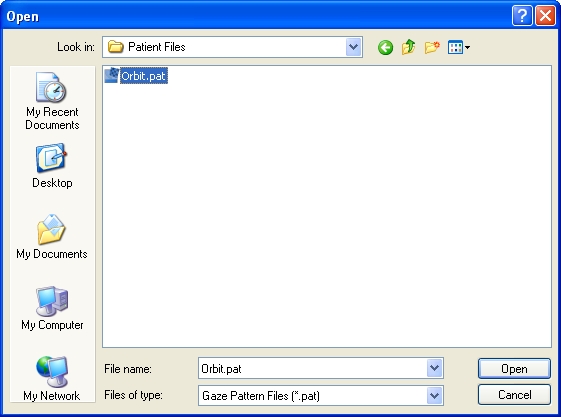
After clicking the button to load a gaze pattern, the dialog to choose a gaze pattern file is displayed. These files have the extension ".pat". Navigate to the desired directory and select the .pat-file you want to load. Then hit the "Open" or "Öffnen" button to load the file. If you push the "Cancel" or "Abbrechen" button, no file is loaded and the current gaze pattern is retained unchanged.
|
Remind that loading and saving gaze pattern files only affects the gaze pattern of the currently selected fixation and the currently selected points. That means that either only the blue or the green points for the left eye fixing or the right eye fixing are stored or replaced. If you want to replace the gaze pattern for both fixations, you have to switch the fixation to e.g. left eye fixing and again load a gaze pattern file. Another possibility is to copy a gaze pattern into the other fixation by clicking the button to copy a gaze pattern. |
|
Use this function to save an existing gaze pattern to a file. Files which save gaze patterns have the extension ".pat" and can be loaded anytime in the gaze pattern dialog via the open function (see above).
|
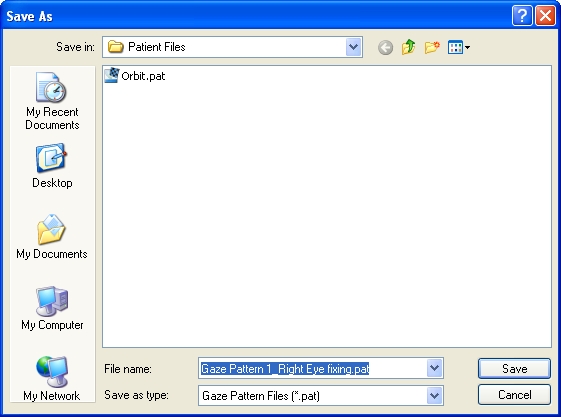
After clicking the button to save the gaze pattern, the dialog to choose a location and a filename is displayed. Go ahead like you have done when opening a gaze pattern. Navigate to the desired directory and after naming the file, store it by clicking the "Save" or "Speichern" button.
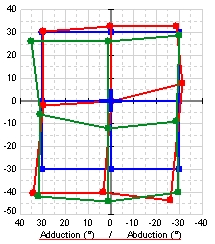
Besides the fixation gaze pattern for the Hess-Lancester-Test simulation, SEE++ offers an additional alternative to draw a "real" gaze pattern clinically measured on a patient for comparing reasons.
|
This button switches between blue and green points. The green points represent real patient data. The drawing of the green gaze pattern for right eye fixing as well as for left eye fixing works in the same way as was explained for the fixation points for the blue gaze pattern (see above). Loading and saving of green gaze patterns can as well be applied analogously.
|
|
When using a measured green gaze pattern, there exists the additional possibility to specify in which head-tilt the gaze pattern was measured. The entered head-tilt angle is displayed in the additional information box of the Hess-diagram. However, it has no influence on the simulation. |
|
If the Hess-Lancester-Test was simulated with SEE++ and the results are displayed, the green "measured" gaze pattern, if it was defined in the gaze pattern dialog, is additionally displayed. This allows an easy direct comparison between the simulation and the clinically measured data. |
In the computer system Orbit™ the gaze patterns are saved to the single "simulation file" as well. SEE++ offers the possibility to import a gaze pattern from an Orbit-File. To achieve this, use the "Import..." button. The procedure is handled in the same way as when loading a SEE++ gaze pattern file (.pat file).
The "Enter Squint-Angles..." button enables you to enter a gaze pattern via a template for the nine main gaze directions.
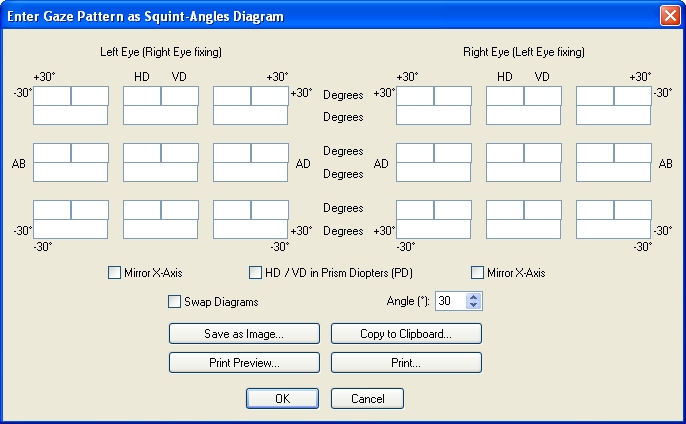
Besides the input of the horizontal deviation (HD), the vertical deviation (VD) and the torsional angle (see simulation) the textual input offers the possibility to swap the diagrams in all horizontal axes. That is because the clinical usage is not always standardized.
Use "Mirror X-Axis" to mirror the entered points in the particular diagram. Use "Swap Diagrams" to swap the left eye fixing and the right eye fixing. By default the convention of the sight of the patient is used, which means that in the examiners view the patient's right eye is left. The maximum gaze angle for the nine main gaze directions can be adjusted with the "Angle" field. Furthermore, the deviations can be entered in degrees and prism diopters. If you want to skip one point (because for example it couldn't be fixed by the patient), you can simply delete the complete content (0.0 has to be deleted too!) of the three deviation fields (HD, VD and torsion) of the appropriate point or leave all three fields empty. In case no torsion has been measured in a specific gaze direction, simply delete the content of the corresponding torsion field or leave it empty (0.0 would mean a measured torsion of 0 degrees).
A textually entered gaze pattern can be saved as an image, copied to the clipboard or printed. Furthermore you can check the gaze pattern you want to print via the print preview.
|
Remind the different algebraic sign for the right eye fixing and the left eye fixing, which only applies when using the textual input. |