Scenarios


|
Scenarios |
|
Scenarios can be edited exclusively via the Treeview. In a scenario all three eyes (reference eye, left eye, right eye) with all the corresponding medical data (globe data, muscle data, distribution of innervations, motor fusional ability, gaze pattern) are stored. Furthermore, each scenario can have an ambiguous name that needs to have a minimum length of five characters. All scenarios can be found under the "Scenarios" element in the Treeview. By default there exist four scenarios in SEE++:
|
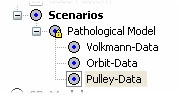
•Pathological Model: This scenario contains the original data for all other scenarios (default data). It cannot be deleted, overwritten, renamed, unlocked or duplicated. •Volkmann-Data: This scenario contains the muscle and globe data based on Volkmann. In this data the pulleys are equal to the anatomical origins. |
•Orbit-Data: This scenario contains the same original data as it is used in the Orbit™ computer system (this data can be found in the "Orbit_Norm" file of the Orbit™ computer system). This data is similar to the data stored in the pathological model with some minimally different parameters. This scenario is primary used to compare simulations done with the Orbit-Model in SEE++ with the Orbit™ computer system.
•Pulley-Data: This scenario contains the same data as the "Pathological Model". By default it is the active scenario and is used as source for new scenarios.
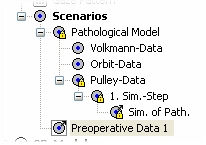
Scenarios are in a hierarchical relationship to each other. That means that a sub-scenario always depends on the data of the scenario it was created of. All scenarios are based on the data of the "Pathological Model". Scenarios in the same tree level as the "Pathological Model" represent so-called preoperative data. Surgeries can be simulated based on this data. The responsibility to define which scenario represents preoperative data lies with the user. One possible approach is to first simulate a pathology based on the pulley data, then one transfers the final result of the simulation to preoperative data and finally the surgery is simulated. At the end of the simulation the result of the surgery can again be transferred to preoperative data, for example to perform another surgery.
Only one scenario can be active at the same time in the program. The active scenario is marked with a small grey quadratic frame around the symbol besides the name of the scenario. The user can switch the active scenario by clicking on a scenario (name or symbol) with the left or the right mouse button. The selected scenario thereby is chosen as active scenario and loaded at the same time. If the user performs a left-click on the active scenario, it is reloaded. When loading a scenario, the medical data stored in the scenario is compared with the current data (which can be viewed via the Treeview or the main menu). If differences exist, the following warning is displayed:
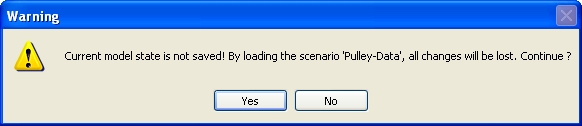
If the user clicks on "Yes" or "Ja", all current changes of the medical data are discarded and are overwritten with the data from the chosen scenario. A click on "No" or "Nein" aborts the process and the scenario is not loaded as well as not set active, if it is not already active.
|
Only discard changes if you are sure that you do not need them any more. This procedure cannot always be completely undone! |
If a view is assigned to a scenario, then, when loading a scenario, the assigned view is loaded together with the scenario by default (thereby the current view is overwritten). If you do not want that the assigned views are loaded automatically with a scenario, you can turn of this behaviour using the general options.
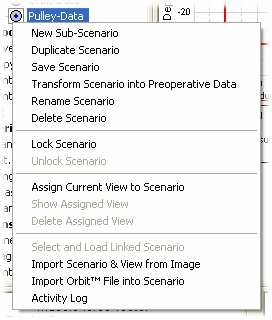
There exists a menu for editing scenarios, which can be displayed by right-clicking on a scenario. This menu always refers to the scenario that was clicked on with the right mouse button. That is also the reason why a scenario is loaded when clicking on it with the right mouse button.
|
Changes to the gaze pattern of the current scenario (via the gaze pattern dialog) are directly saved in the scenario and do not have to (as changes to the medical data) be saved with "Save Scenario". Furthermore, the gaze pattern of locked scenarios can be changed anytime. You only have to set the scenario active and perform the desired changes via the gaze pattern dialog. |
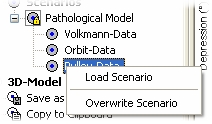
There exists an exception for this behaviour. This exception occurs when the currently selected scenario contains one or more unlocked sub-scenarios. If you click on one of this unlocked sub-scenarios with the right mouse button, a menu is displayed. This menu allows you to overwrite the sub-scenario with the currently selected scenario data. As an alternative, you can load the clicked scenario via the other menu item.
New Sub-Scenario
This menu item creates a new scenario one level beneath the selected scenario. The data for the new scenario is copied from the selected scenario. Before the new scenario is created, the following dialog is displayed:
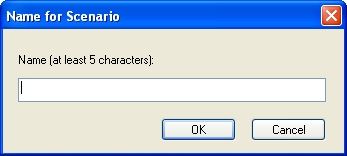
In this dialog the name of the scenario has to be entered (at least 5 characters). When clicking the "OK" button, the new scenario is created and shown in the tree. A click on "Cancel" aborts the creation process and no new scenario is created. When creating a new sub-scenario, the scenario beneath which the new scenario is created is automatically locked and the new scenario is set active to assure the traceability of the changes in the scenarios. Sub-scenarios can also be created for locked scenarios.
|
If you have forgotten to create a new scenario before changing the medical data and you do not want to loose your changes and do not want to overwrite the active scenario, proceed as follows: Create a new sub-scenario based on the active scenario or duplicate it. Ignore the warning concerning unsaved changes by clicking on "No" or "Nein". After entering a name for the new scenario right-click on the new scenario and afterwards left-click on the menu item "Save Scenario". Thereby your changes of the new scenario are saved and the parent scenario is not overwritten. |
Duplicate Scenario
This menu item creates a copy of the selected scenario and inserts it into the level where the selected scenario is located. Before creating a new scenario the user has, just like when creating a new sub-scenario, the possibility to specify a name for the new scenario. The name of the selected scenario is automatically proposed as name for the new scenario. Scenarios on the same level as the "Pathological Model" (scenarios that contain preoperative data) cannot be duplicated. Locked scenarios can be duplicated, whereas the new scenario is not automatically locked. The newly created scenario is automatically set active.
Save Scenario
A click on the menu item "Save Scenario" saves the medical data of all three eyes to the selected scenario and overwrites all the data that was stored in this scenario before. If a scenario is locked, it cannot be saved.
Transform Scenario into Preoperative Data
If the simulation of a pathology is completed, you can create a new scenario with the help of this menu item which has some special properties. The reason for this special type of scenario is the better differentiation between the simulation of a pathology and the simulation of a surgery. The special properties of scenarios transformed into preoperative data are:
|
•The new scenario is always at the same level as the "Pathological Model". More precisely all scenarios at the level of the "Pathological Model" represent preoperative data. The "Pathological Model" contains preoperative data too. But there exists no scenario it was created off, because it is the global parent scenario. |
•When creating a new scenario, the parent scenario is automatically locked to assure the traceability of the changes in the scenarios.
•Between the new scenario and the parent scenario a link is set up which is visualized in form of a small arrow in the upper right corner of the symbol next to the name of both scenarios (see also "Select and Load Linked Scenario").
For the new scenario (as when creating a sub-scenario) a name has to be specified.
Rename Scenario
This menu item allows you to change a scenario's name after its creation.
Delete Scenario
This menu item deletes the selected scenario and all its sub-scenarios. If the selected scenario or one of its associated sub-scenarios contains a link to preoperative data, a warning is displayed. That is because after the deletion the links of referenced preoperative scenarios to the appropriate referring scenarios are invalid. If a scenario with preoperative data is deleted, the link in the associated referring scenario is deleted too.
Lock Scenario/Unlock Scenario
When creating a sub-scenario and transforming a scenario into preoperative data, the referring scenario is automatically locked and cannot be unlocked as long as the created sub-scenario or the scenario with the preoperative data exists. The reason of this automatic lock is to assure the traceability of the changes in the scenarios. A locked scenario can be recognized by the small yellow lock icon displayed in the lower right part of the symbol next to the name of the scenario. Scenarios that are not locked automatically can be manually locked via the menu item "Lock Scenario". This is useful to avoid changes that can be done accidentally such as overwriting through saving or through the import of Orbit-Files. The locking of a scenario does not prevent it from being deleted. Via the menu item "Unlock Scenario" a scenario can be unlocked again, if the scenario's hierarchical position allows it.
Select and Load Linked Scenario
This menu item can only be selected, if the selected scenario was created via the menu item "Transform Scenario into Preoperative Data" and the referring scenario was not deleted yet. In this case the referring scenario is selected as the active scenario and is loaded.